Difference between revisions of "Charged Bolt"
Jump to navigation
Jump to search
Onderduiker (talk | contribs) m (Minor changes) |
m |
||
| (7 intermediate revisions by 2 users not shown) | |||
| Line 11: | Line 11: | ||
|Mana=2.5 + (0.5*slvl) | |Mana=2.5 + (0.5*slvl) | ||
|ANM=No | |ANM=No | ||
| − | |WD= | + | |WD=No |
|LB=Yes}} | |LB=Yes}} | ||
{{U|=By charging the ions in the air surrounding her, the Sorceress discharges bursts of electrical energy. These missiles flit about randomly, chasing down her opponents and shocking them to the core.}} | {{U|=By charging the ions in the air surrounding her, the Sorceress discharges bursts of electrical energy. These missiles flit about randomly, chasing down her opponents and shocking them to the core.}} | ||
| Line 35: | Line 35: | ||
|min(2+slvl , 24) | |min(2+slvl , 24) | ||
|} | |} | ||
| + | |||
*Bolts are [[size]] 1 and destroyed upon collision, so each can only hit one target. However, multiple bolts can hit the same target. As a result, they are most effective when cast at targets at close range since they disperse as they travel further away from the caster. | *Bolts are [[size]] 1 and destroyed upon collision, so each can only hit one target. However, multiple bolts can hit the same target. As a result, they are most effective when cast at targets at close range since they disperse as they travel further away from the caster. | ||
| − | |||
*[[Cast rate]] | *[[Cast rate]] | ||
| − | <br> | + | |
| + | |||
| + | [[File:Charged Bolt.png|center|frame|Unlike [[Teeth]] and [[Multiple Shot]], the position of the cursor or target does not affect trajectory of the bolts; only the direction in which they are cast does so.]] | ||
| + | |||
| + | |||
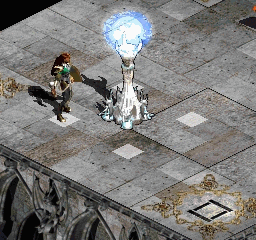
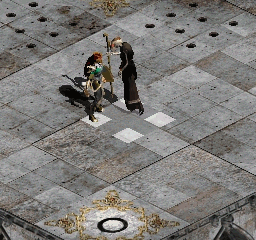
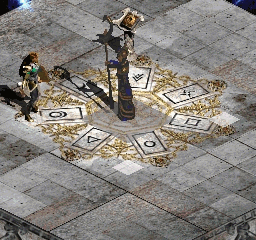
| + | *Level >21 casts maximum 24 bolts. Optimal casting position against a single target varies depending on target size. | ||
| + | |||
| + | |||
| + | {|cellpadding=0 cellspacing=0 width=100% | ||
| + | |width=33%| | ||
| + | [[File:Charged Bolt (size 1).PNG|center|frame|[[Size#Size 1|Size 1]] target is hit by 16 of 24 bolts from highlighted positions; [[teleport]]ing on top of a selected target results in it being hit by only 8 bolts.]] | ||
| + | |width=34%| | ||
| + | [[File:Charged Bolt (size 2).PNG|center|frame|[[Size#Size 2|Size 2]] target is hit by all 24 bolts from highlighted positions; teleporting on top of a selected target places caster in one of these positions.]] | ||
| + | | | ||
| + | [[File:Charged Bolt (size 3).PNG|center|frame|[[Size#Size 3|Size 3]] target is hit by 21 of 24 bolts from highlighted positions; teleporting on top of a selected target results in it being hit by only 16 bolts.]] | ||
| + | |} | ||
| + | |||
| + | |||
| + | *Every charged bolt will trigger a [[Chilling Armor]] bolt, something to keep in mind when confronting [[Izual (Pandemonium Event)|{{Ub|=Izual}}]] and [[Baal (Pandemonium Event)|{{Ub|=Baal}}]] in the [[Pandemonium Event]]. | ||
| + | <br/> | ||
==Source== | ==Source== | ||
| + | *Also used by [[Iron Wolf]]. | ||
| + | <br/> | ||
===[[Skill bonus]]=== | ===[[Skill bonus]]=== | ||
| − | *+(1-3) Charged Bolt ([[Sorceress]] Only) can spawn on ilvl <25 [[ | + | *+(1-3) Charged Bolt ([[Sorceress]] Only) can spawn on ilvl <25 [[orb]]s and [[staff|staves]]. |
| Line 54: | Line 75: | ||
|75||No | |75||No | ||
|} | |} | ||
| − | <br> | + | <br/> |
===[[Charged suffix]]=== | ===[[Charged suffix]]=== | ||
| Line 62: | Line 83: | ||
|33||37||41||45||48||52||56||60||63||67 | |33||37||41||45||48||52||56||60||63||67 | ||
|align=left| | |align=left| | ||
| − | *[[ | + | *[[Orb]] |
| − | *[[ | + | *[[Staff]] |
|1||7||7 | |1||7||7 | ||
|-valign=top | |-valign=top | ||
| Line 69: | Line 90: | ||
|22||25||27||30||32||35||{{E}}||{{E}}||{{E}}||{{E}} | |22||25||27||30||32||35||{{E}}||{{E}}||{{E}}||{{E}} | ||
|align=left| | |align=left| | ||
| − | *[[ | + | *[[Circlet]] |
| − | *[[ | + | *[[Hammer]] |
| − | *[[ | + | *[[Mace]] |
| − | *[[ | + | *[[Scepter]] |
| − | *[[ | + | *[[Ring]] |
|1||14||14 | |1||14||14 | ||
|} | |} | ||
| − | <br> | + | <br/> |
===[[Chance to Cast]]=== | ===[[Chance to Cast]]=== | ||
| Line 88: | Line 109: | ||
!{{Warn|=Yes}} | !{{Warn|=Yes}} | ||
|} | |} | ||
| − | <br> | + | <br/> |
====[[On Striking]]==== | ====[[On Striking]]==== | ||
| Line 94: | Line 115: | ||
|- | |- | ||
|9||11 | |9||11 | ||
| − | |align=left|[[Chaos | + | |align=left|[[Chaos|{{Ub|=Chaos}}]] claw |
|57||No | |57||No | ||
|- | |- | ||
| Line 101: | Line 122: | ||
|41||No | |41||No | ||
|} | |} | ||
| − | <br> | + | <br/> |
====[[When Struck]]==== | ====[[When Struck]]==== | ||
| Line 137: | Line 158: | ||
|3||10||align=left rowspan=3| | |3||10||align=left rowspan=3| | ||
*Armor | *Armor | ||
| − | *[[ | + | *[[Amulet]] |
| − | *[[ | + | *[[Ring]] |
|4||6 | |4||6 | ||
|- | |- | ||
| Line 147: | Line 168: | ||
|19||26 | |19||26 | ||
|} | |} | ||
| − | <br> | + | <br/> |
==Levels 1-60== | ==Levels 1-60== | ||
| Line 235: | Line 256: | ||
|72.5||74.5||76.5||78.5||80.5||82.5||84.5||86.5||88.5||90.5 | |72.5||74.5||76.5||78.5||80.5||82.5||84.5||86.5||88.5||90.5 | ||
|} | |} | ||
| − | <br> | + | <br/> |
==Reference== | ==Reference== | ||
*[http://classic.battle.net/diablo2exp/skills/sorceress-lightning.shtml Lightning Spells] (Arreat Summit) | *[http://classic.battle.net/diablo2exp/skills/sorceress-lightning.shtml Lightning Spells] (Arreat Summit) | ||
Latest revision as of 00:50, 18 July 2024
By charging the ions in the air surrounding her, the Sorceress discharges bursts of electrical energy. These missiles flit about randomly, chasing down her opponents and shocking them to the core.
Detail
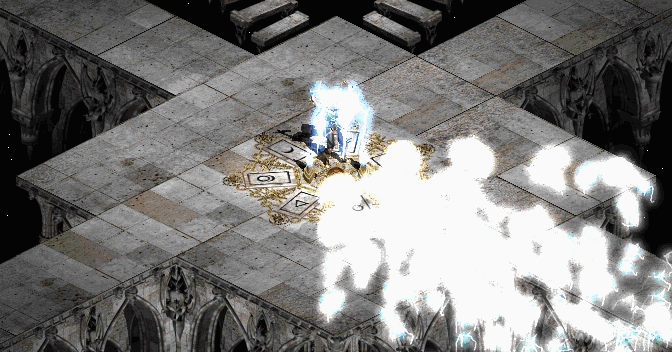 Unlike Teeth and Multiple Shot, the position of the cursor or target does not affect trajectory of the bolts; only the direction in which they are cast does so.
Source
Skill bonus
Charged suffix
Chance to CastOn Attack
On Striking
When Struck
Levels 1-60
Reference
|
||||||||||||||||||||||||||||||||||||||||||||||||||||||||||||||||||||||||||||||||||||||||||||||||||||||||||||||||||||||||||||||||||||||||||||||||||||||||||||||||||||||||||||||||||||||||||||||||||||||||||||||||||||||||||||||||||||||||||||||||||||||||||||||||||||||||||||||||||||||||||||||||||||||||||||||||||||||||||||||||||||||||||||||||||||||||||||||||||||||||||||||||||||||||||||||||||||||||||||||||||||||||||||||||||||||||||||||||||||||||||||||||||||||||||||||||||||||||||||||||||||||||||||||||||||||||||||||||||||||||||||||||||||||||||||||||||||||||||||||||||||||||||||||||||||||||||||||||||
